Parallax image
This topic describes how to create parallax effect, which are implemented in the following examples.
- ParallaxToolbarScrollViewActivity
- ParallaxToolbarListViewActivity
Overview
In this topic, "parallax" means the following layout and behavior:
- The layout has an image on the top of the layout.
- The image will move with half the speed of that of the ScrollView.
- ScrollView itself has a big padding, which is like a "window" to see the image.
To make the image "parallax", we need to do some tricks on the layout.
ObservableScrollView and ObservableListView are a little different
around handling paddings.
I'll explain from ObservableScrollView.
ScrollView
Layout
Basic structure
At first, let's see the following basic structure of the layout.
<FrameLayout>
  <ObservableScrollView>
    <RelativeLayout>
      <ImageView/>
      <View/>
      <TextView/>
    </RelativeLayout>
  </ObservableScrollView>
  <Toolbar/>
</FrameLayout>
Please note that in this XML, I intentionally omitted attributes(android:XXX)
and package name (com.github.XXX) for readability.
Why should we use FrameLayout?
As you can see on the example app, Toolbar is overlaid to the ObservableScrollView.
To do this, we need to use FrameLayout or RelativeLayout.
What's inside of the ObservableScrollView?
ObservableScrollView extends ScrollView, so it can have no more than 1 child.
However we need more children, so placing a ViewGroup as the child of ObservableScrollView is required.
ImageView is the View which is going to have "parallax" effect.
You can replace it to other type of View if you want.
TextView is the main content of the screen, you can also replace it to other type of View.
View is an "anchor", I'll explain it later.
We need to move the content and the image separately,
so the parent of them — child of ObservableScrollView —
should be RelativeLayout or FrameLayout.
This time, we use RelativeLayout for that purpose.
Don't move the content when its parent is scrolled
How do you place the main content (a TextView for this time) under the ImageView?
Suppose you define the position with android:layout_below attribute:
<!-- some attributes are omitted -->
<RelativeLayout>
  <ImageView android:id="@+id/image">
  <TextView android:layout_below="@id/image">
</RelativeLayout>
We need to move ImageView but if we do this,
the TextView moves with the same speed as ImageView
because its layout is defined with android:layout_below="@id/image".
So we should define the TextView's position with another "anchor" view:
<!-- some attributes are omitted -->
<RelativeLayout>
  <ImageView android:id="@+id/image"
             android:layout_height="@dimen/parallax_image_height">
  <View android:id="@+id/anchor"
        android:layout_height="@dimen/parallax_image_height"
        android:minHeight="@dimen/parallax_image_height" />
  <TextView android:layout_below="@id/anchor">
</RelativeLayout>
With this anchor view, we can move only ImageView.
The anchor View and TextView will remain in their position.
Set the content color explicitly
We need to set the background color of the main content explicitly, because the image is underlying.
<TextView android:layout_below="@id/anchor"
  android:background="@android:color/white" />
Complete the layout
Now set the rest of the attributes of the layout,
such as android:layout_width, android:padding, etc.
Please see the folloing codes for details.
res/layout/activity_parallaxtoolbarscrollview.java
Animation
Basic structure of Activity
We use AppCompatActivity of the v7 appcompat library for the base Activity class,
and implement ObservableScrollViewCallbacks.
public class ParallaxToolbarScrollViewActivity
  extends AppCompatActivity implements ObservableScrollViewCallbacks {
Initialize views
Then initialize the views like this.
// Fields
private View mImageView;
private View mToolbarView;
private ObservableScrollView mScrollView;
private int mParallaxImageHeight;

@Override
protected void onCreate(Bundle savedInstanceState) {
  super.onCreate(savedInstanceState);
  setContentView(R.layout.activity_parallaxtoolbarscrollview);

  setSupportActionBar((Toolbar) findViewById(R.id.toolbar));

  mImageView = findViewById(R.id.image);
  mToolbarView = findViewById(R.id.toolbar);
  mToolbarView.setBackgroundColor(
    ScrollUtils.getColorWithAlpha(0, getResources().getColor(R.color.primary)));

  mScrollView = (ObservableScrollView) findViewById(R.id.scroll);
  mScrollView.setScrollViewCallbacks(this);

  mParallaxImageHeight = getResources().getDimensionPixelSize(
    R.dimen.parallax_image_height);
}
The Toolbar should be transparent at the beginning, so set the alpha of the background color to 0
by using the ScrollUtils utility class.
This is optional and you can omit this if you don't use the Toolbar.
Change the position on scrolling
We use onScrollChanged() method, one of ObservableScrollViewCallbacks, to animate the view.
What we need to do in this method is:
- translate the
ImageViewin Y-axis usingscrollYparameter - change the alpha value of the background color of the
ToolbarusingscrollYparameter
The second one is optional. You can omit this if you don't use the Toolbar.
Translate the ImageView
Just set the translateY property to half of scrollY.
If you want to change the "depth" of the parallax effect, adjust this value (scrollY / 2).
@Override
public void onScrollChanged(int scrollY, boolean firstScroll, boolean dragging) {
  ViewHelper.setTranslationY(mImageView, scrollY / 2);
}
Change the alpha of the Toolbar background color
We should change the alpha value of the background color of the Toolbar, so we can write like this.
@Override
public void onScrollChanged(int scrollY, boolean firstScroll, boolean dragging) {
  int baseColor = getResources().getColor(R.color.primary);
  float alpha = 0; // TODO Fix this value
  mToolbarView.setBackgroundColor(ScrollUtils.getColorWithAlpha(alpha, baseColor));
Changing alpha is a little complicated, so I wrote float alpha = 0 temporarily.
Let's confirm the conditions of the colors and fix the alpha value.
- If the
ObservableScrollViewis not scrolled, Toolbar is transparent.
(IfscrollYequals to 0, alpha of the Toolbar is 0.) - If the
ObservableScrollViewis scrolled, it becomes opaque gradually, and when it's scrolled to a certain point, Toolbar is completely opaque.
(IfscrollYequals tomParallaxImageHeight, alpha of the Toolbar is 1.)
We need to express these conditions as a formula.
alpha should changes from 0 to 1, but scrollY changes from 0 to thousands,
so scrollY should be scaled.
We should divide scrollY with mParallaxImageHeight because
when alpha becomes 1, scrollY should be equal to mParallaxImageHeight.
float alpha = (float) scrollY / mParallaxImageHeight;
Please note that scrollY and mParallaxImageHeight are both type int,
so you need to cast one of them to float.
But how is it when scrollY becomes more than mParallaxImageHeight?
Let's simulate the result values:
scrollY |
mParallaxImageHeight |
alpha |
Valid alpha? |
|---|---|---|---|
| 0 | 300 | 0 | Valid |
| 150 | 300 | 0.5 | Valid |
| 300 | 300 | 1.0 | Valid |
| 450 | 300 | 1.5 | Invalid |
As we can see in the 4th row (scrollY == 450),
we need to control alpha so that it will not exceed 1.0.
This time we use Math.min() to limit the value from 0 to 1.
float alpha = Math.min(1, (float) scrollY / mParallaxImageHeight);
Now it's done.onScrollChanged will be like this:
@Override
public void onScrollChanged(int scrollY, boolean firstScroll, boolean dragging) {
  int baseColor = getResources().getColor(R.color.primary);
  float alpha = Math.min(1, (float) scrollY / mParallaxImageHeight);
  mToolbarView.setBackgroundColor(ScrollUtils.getColorWithAlpha(alpha, baseColor));
  ViewHelper.setTranslationY(mImageView, scrollY / 2);
}
Restore scroll state
We need to handle one more thing: restoring scroll state when the Activity is restored.ObservableScrollView itself stores its scroll position,
so you just need to update the view
in the onRestoreInstanceState() method.
@Override
protected void onRestoreInstanceState(Bundle savedInstanceState) {
  super.onRestoreInstanceState(savedInstanceState);
  onScrollChanged(mScrollView.getCurrentScrollY(), false, false);
}
ListView
Let's see the difference of the implementation between ListView version and ScrollView version.
Layout
Basic structure
<FrameLayout>
  <ImageView/>
  <View/>
  <ObservableListView/>
  <Toolbar/>
</FrameLayout>
We use FrameLayout to the root view, just like ScrollView pattern.FrameLayout can be used to move children views separately.
ImageView is the view which should have "parallax" effect.
The next View is used for different purpose from that of ScrollView.
I'll explain this later.
Why do we use different layout?
Unlike ScrollView, ListView cannot have children views,
so ImageView should be outside of the scrollable view (ListView)
and we should move the ImageView manually.
How do we place ImageView and ListView?
ImageView is going to be scrolled slower than ListView
(because we're going to make "parallax" effect),
so ImageView should be underneath the ListView.
Otherwise, the bottom of the ImageView overlaps with the top of the ListView.
Also, ListView should have a big padding
at the top of the ListView to make ImageView visible.
We achieve this by adding a transparent header view to the ListView.
Why do we need a View?
As I mentioned above, ListView should have a transparent header, so its background color should be also transparent. But if we do this, not only the header view but also the items of the ListView become transparent.
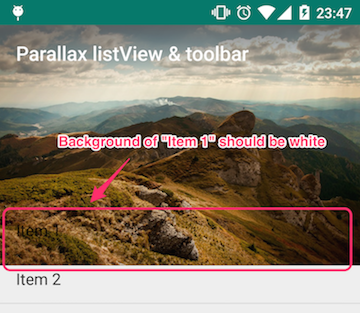
To avoid this, we set a dummy background view under the ListView.
Animation
Basic structure of Activity
It's same as ParallaxToolbarScrollViewActivity example.
public class ParallaxToolbarListViewActivity
  extends BaseActivity implements ObservableScrollViewCallbacks {
Initialize views
Like ScrollView, initialize the ObservableListView, ImageView, Toolbar, etc.
And as I explained, ListView should have a header view.
private View mImageView;
private View mToolbarView;
private View mListBackgroundView;
private ObservableListView mListView;
private int mParallaxImageHeight;

@Override
protected void onCreate(Bundle savedInstanceState) {
  super.onCreate(savedInstanceState);
  setContentView(R.layout.activity_parallaxtoolbarlistview) ;

  setSupportActionBar((Toolbar) findViewById(R.id.toolbar));

  mImageView = findViewById(R.id.image);
  mToolbarView = findViewById(R.id.toolbar);
  mToolbarView.setBackgroundColor(ScrollUtils.getColorWithAlpha(0, getResources().getColor(R.color.primary)));

  mParallaxImageHeight = getResources().getDimensionPixelSize(R.dimen.parallax_image_height);

  mListView = (ObservableListView) findViewById(R.id.list);
  mListView.setScrollViewCallbacks(this);
  // Set padding view for ListView. This is the flexible space.
  View paddingView = new View(this);
  AbsListView.LayoutParams lp = new AbsListView.LayoutParams(AbsListView.LayoutParams.MATCH_PARENT,
          mParallaxImageHeight);
  paddingView.setLayoutParams(lp);
  paddingView.setClickable(true);

  mListView.addHeaderView(paddingView);
  setDummyData(mListView);
  mListBackgroundView = findViewById(R.id.list_background);
Note that following code is necessary to disable header view's list selector effect.
paddingView.setClickable(true);
setDummyData() should be replaced to appropriate data population codes.
Change the position on scrolling
Translate the ImageView
We use onScrollChanged method to translate views.
@Override
public void onScrollChanged(int scrollY, boolean firstScroll, boolean dragging) {
}
Basically, we should just set the translateY property to half of scrollY.
But be careful, unlike ScrollView, when scrollY gets larger then translateY of ImageView should become smaller
because ImageView is not a child of the ListView.
So we should use -scrollY / 2 as translationY (and you can adjust "/ 2" if you want).
ViewHelper.setTranslationY(mImageView, -scrollY / 2);
Translate the background view
The background should move with ListView, but it should have an offset mParallaxImageHeight
so we can write like this:
ViewHelper.setTranslationY(mListBackgroundView, mParallaxImageHeight - scrollY);
But how is it when scrollY becomes more than mParallaxImageHeight?
Let's simulate the result values:
mParallaxImageHeight |
scrollY |
mParallaxImageHeight - scrollY |
TranslationY of mListViewBackgroundView should be |
|---|---|---|---|
| 300 | 0 | 300 | 300 |
| 300 | 150 | 150 | 150 |
| 300 | 300 | 0 | 0 |
| 300 | 450 | -150 | 0 |
The 4th mParallaxImageHeight - scrollY becomes negative and it's invalid.
So use Math.max() to avoid this.
ViewHelper.setTranslationY(mListBackgroundView, Math.max(0, -scrollY + mParallaxImageHeight));
That's all.
The rest of the codes are the same as ObservableScrollView example.